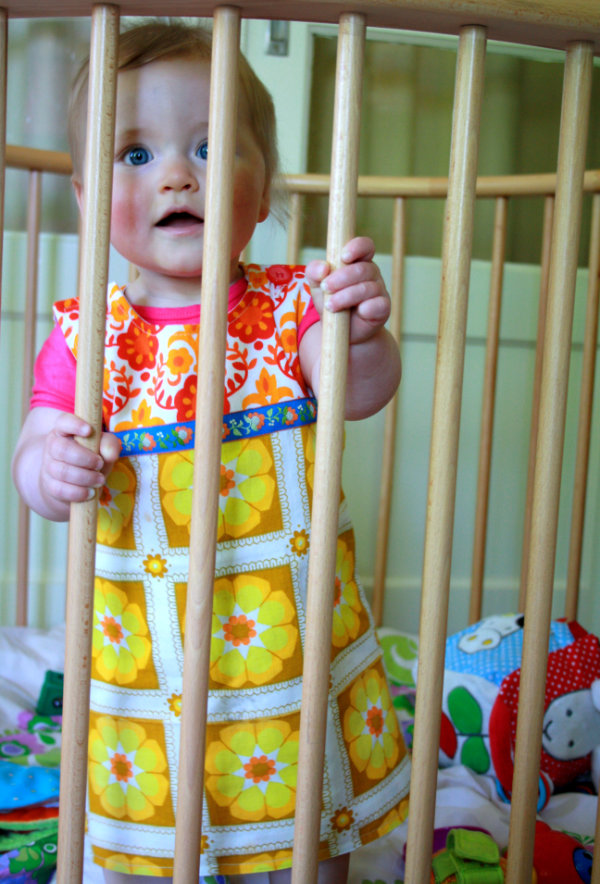
Free sewing pattern and tutorial Dutch baby dress


This dubble layered dress closes with two buttons on the shoulders and two small buttons underneath the armpits. Sizes range from 3 months - 2T.


Materials:
* Cotton fabric
   1/2 yard of cotton, 44" wide (size 3 months - 3T)
   1 yard of cotton, 44" wide (size 4Y - 8Y)
   1 1/2 yard of cotton, 44" wide (Size 9Y - 11Y)
* Plain white cotton fabric (lining)
   1/2 yard of cotton, 44" wide (size 3 months - 3T)
   1 yard of cotton, 44" wide (size 4Y - 8Y)
   1 1/2 yard of cotton, 44" wide (Size 9Y - 11Y)
* Two buttons -  ⌀ 4/5" (⌀ 2 cm)
* Two buttons - ⌀ 2/5" (⌀ 1 cm)
* Elastic - 1/5" wide x 6.5" long (0,5 cm x 16 cm)

Instructions:
Download the free sewing pattern from the list below.

Newborn
3 months
6 months
9 months
12 months
18 months
2T
3T

Double-click images to enlarge.

Step 1: Draw the pattern.
Draw a front piece (marked red (upper part) and green (lower part)) and back piece (marked yellow (upper part) and green (lower part)) with an aqua trickmarker on the back of the fabric for the lining. Draw a back piece (marked yellow (upper part) and green (lower part)) on the back of the plaid fabric in red & white.

Combine the paper pattern for the front piece (marked red (upper part) and green (lower part)) to one piece using tape. Cut the paper pattern in half vertically 1 cm (0.4 in) underneath the ampits. Draw the upper front piece on the back of the plaid fabric in red & white. Draw the lower front piece on the back of the plaid fabric in blue & white. Add 1 cm (0.4 in) seam allowance to the cutting line. 

Step 2: Cut the fabric.
Cut the front and back pieces twice out of the fabrics.

Step 3: Pin upper front piece to lower front piece.
With right sides facing, pin the upper front piece to the lower front piece. Sew.


Step 4: Topstitch.
Topstitch.

Step 5: Pin the ribbon in place.
Pin the ribbon in place.

Step 6: Sew.
Sew.

Step 7: Pin front piece to back piece.
With right sides facing, pin down the front piece to the back piece. Also pin front and back of the lining together.


Step 8: Sew the sides of both dresses until the pattern marks.
Sew the sides of both dresses until the pattern marks at 3/8″ (1 cm) seam allowance.

Step 9: Flip the lining right side out.
Flip the lining right side out.

Step 10: Pin neck- and shoulder seams.
Put the lining of the dress in the outer dress. Pin the neck- and shoulder seams of the lining of the dress and the outside of the dress together with right side facing.

Step11: Sew neck and shoulder seams at the front.
Sew neck and shoulder seams at the front from armpit to armpit. Sew at 3/8″ (1 cm) seam allowance.


Step 12: Sew neck and shoulder seams at the back.
Turn the dress. Sew the neck and shoulder seams at the back at 3/8″ (1 cm) seam allowance.


Step 13: Sew elastic.
Sew at 3/8″ (1 cm) seam allowance.Cut the elastic in half. Fold both elastic pieces in half lengthwise. Put the elastic in place. The elastic loops are placed just underneath the left and right armpit. The elastic loops are 1 1/4" (3 cm) long. Sew a couple of times over the elastic, so it will be attached firmly.


Step 14: Sew the upper part of the sides of the dress.
Sew the upper part of the sides of the dress (just underneath the armpits) at 3/8″ (1 cm) seam allowance.

Step 15: Trim.
Trim.

Step 16: Topstitch.
Flip the dress right side out. Topstitch at 1/4" (0,5 cm) from the edge.

Step 17: Hem the dress.
Hem the dress. Fold 3/4″ (2 cm) and sew at 5/8″ (1,5 cm) from the outer edge.


Step 18: Stitch the buttonholes at the front.
Using a ruler, mark where your buttons and buttonholes will go. Stitch the buttonholes at the front.


Step 19: Sew the buttons at the back.
Sew the buttons (⌀ 4/5" - ⌀ 2 cm) on properly to make certain that they function well and last for years. Also sew the small buttons (⌀ 2/5" - ⌀ 1 cm ) at the back, just underneath both armpits.

© small dreamfactory
intended for non commercial use only

Free sewing tutorial and sewing pattern sleeveless baby bodysuit


Materials:
* Jersey knits, 60" wide
 - 1/2 yard (Newborn - 3 months)
 - 1 yard (9 months - 4Y)
* Ribbing
* Three Snaps

Instructions:
Download the free sewing pattern from the list below.

Newborn
1-2 months
2-4 months

You can find the instructions for a short sleeve bodysuit here.

When working with knits, it is important not to stretch or pull the fabric while sewing. Also use a stretch needle and a stretch stitch. In this pattern all seams are sewed with a twin needle.

Double-click images to enlarge.

Step 1: Draw the pattern.
Print the sewing pattern in landscape mode in actual size and using the latest version of Adobe Acrobat Reader. Draw the pattern with an aqua trickmarker on the back of the fabric. The seam allowance is already included in the pattern.

Step 2: Cut the fabric.
Cut a front piece and a back piece out of the fabric.

Step 3: Sew neckband.
Align the raw edges of the neckband with the raw edge of the neck opening, wrong sides together. Sew at 3/8″ (1 cm) seam allowance. Stretch the neckband while you sew, but be careful not to stretch or pull the knit fabric.

Step 4: Sew neckband.
Fold the neckband over the cut edge, re-fold and pin down. Sew.

Step 5: Add ribbing to the bottom of the bodysuit.
Align the raw edges of the ribbing with the raw edge of the bottom of the bodysuit, wrong sides together. Sew at 3/8″ (1 cm) seam allowance. Stretch the ribbing while you sew, but be careful not to stretch or pull the knit fabric.

Step 6: Add ribbing to the bottom of the bodysuit.
Fold the ribbing over the cut edge, re-fold and pin down. Sew.

Step 7: Sew part of the shoulder seam.
Put the shoulder of the back piece over the front piece and pin down. Sew at 3/8″ (1 cm) seam allowance.
Step 8: Pin the sides of the bodysuit down.
Turn bodysuit wrong-side out. With right sides facing, pin down the sides of the bodysuit.

Step 9: Sew together.
Sew the sides of the bodysuit at 3/8″ (1 cm) seam allowance.

Step 10 Sew armhole binding
With right sides facing, fold the armhole binding in half. Sew the ends of the strips together at 3/8″ (1 cm) seam allowance to create tubes.
Step 11: Finish off the armholes with binding.
Pin the armholes binding to the armhole. Sew at 3/8″ (1 cm) seam allowance. Stretch the neckband while you sew, but be careful not to stretch or pull the knit fabric.

Step 11: Finish off the armholes with binding.
Fold the armhole binding over the cut edge, re-fold and pin down. Sew.

Step 13: Attach snaps.
Attach the snaps to the bodysuit.

© small dreamfactory
intended for non commercial use only

Free sewing tutorial and sewing pattern short sleeve t-shirt


Materials:
* 1 yard of jersey knits, 60" wide - In the woods, papercanoefabricshop (spoonflower)
* Ribbing

Instructions:
Download the free sewing pattern from the list below.

Size 4Y

When working with knits, it is important not to stretch or pull the fabric while sewing. Also use a stretch needle and a stretch stitch. In this pattern all seams are sewed with a twin needle.

Double-click images to enlarge.

Step 1: Draw the pattern.
Print the sewing pattern in landscape mode in actual size and using the latest version of Adobe Acrobat Reader. Draw the pattern with an aqua trickmarker on the back of the fabric. The seam allowance is already included in the pattern.


Step 2: Cut the fabric.
Cut a front piece, a back piece and two sleeves out of the fabric.

Step 3: Hem the sleeves.
Hem the sleeves. Fold 3/4″ (2 cm) and sew at 5/8″ (1,5 cm) from the outer edge. Mark your seam allowance with an aqua trickmarker on the back of the fabric. Fold the seam allowance to the inside and pin down. Sew the hems in place.

Step 4: Sew the shoulder seams
With right sides facing pin down the back and front piece. Sew the shoulder seams at 3/8″ (1 cm) seam allowance.

Step 5: Sew neckband.
With right sides facing, fold the neckband in half. Sew the ends of the strips together at 3/8″ (1 cm) seam allowance to create tubes. Turn the tubes right side out. Fold the tubes in half lengthwise so the wrong sides are together.

Step 6: Sew neckband.
Align the raw edges of the neckband with the raw edge of the neck opening, wrong sides together. Sew at 1/2″ (1 cm) seam allowance. Stretch the neckband while you sew, but be careful not to stretch or pull the sweatshirt fabric.


Step 7: Turn the neckband right side out.
Turn the neckband right side out.

Step 8: Sew the sleeve into the armhole.
Pin the left sleeve right sides together, into the armhole. Sew at 3/8″ (1 cm) seam allowance.

Step 9: Pin the sides of the shirt and the sleeves down.
Turn shirt wrong-side out. With right sides facing, fold the sleeves in half and pin down. Pin down the sides of the shirt.

Step 10: Sew together. 
Sew the sides of the shirt and the sleeves at 3/8″ (1 cm) seam allowance.

Step 11: Hem the shirt. 
Hem the shirt. Fold 3/4″ (2 cm) and sew at 5/8″ (1,5 cm) from the outer edge. Mark your seam allowance with an aqua trickmarker on the back of the fabric. Fold the seam allowance to the inside and pin down.

Step 12: Sew the hem in place.
Turn right-side out. Sew the hem in place at 5/8″ (1,5 cm) from the outer edge.

© small dreamfactory
intended for non commercial use only